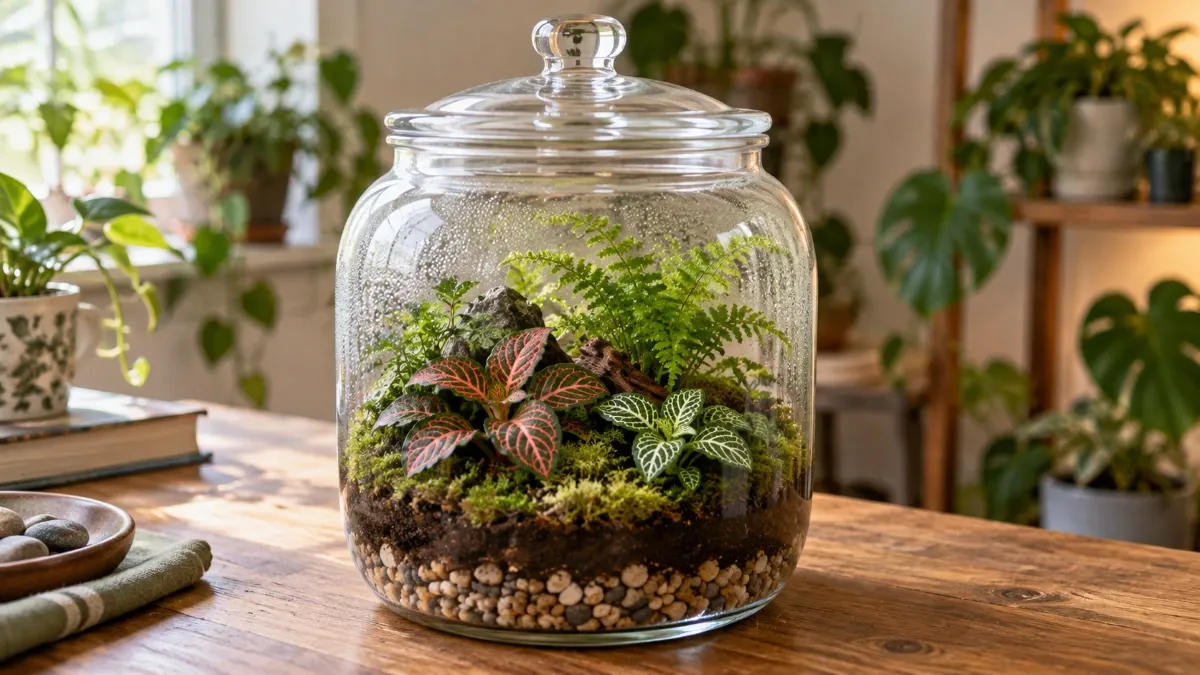
Learning how to make a closed terrarium is fairly easy: choose a clear, lidded container, add a suitable potting mix, plant a few small, humidity-loving plants, add only a little water, and close the container once the leaves are dry. After that, moisture can cycle inside the terrarium instead of constantly escaping into the room.
The trick is to keep the terrarium simple. It is about balancing moisture, plants, light, and space from the start.
What You Need to Make a Closed Terrarium
You do not need a long list of specialty equipment.
For a basic closed terrarium, gather:
- A clear glass or plastic container with a lid
- Fresh potting mix suitable for indoor plants
- A few small plants that like similar conditions
- A spoon or small planting tool
- Long tweezers or chopsticks if the opening is narrow
- A small mister or another way to add water carefully
- Optional decorative stones, wood, or other clean decorations
A wide-opening jar is usually easier to plant than a container with a narrow neck. Whatever you choose, make sure it lets light reach the plants and has enough room for them to grow.
Penn State Extension recommends starting with a clean container and a fresh soilless potting mix rather than heavy garden soil.
Step 1: Clean the Container
Wash the container with hot, soapy water, rinse it well, and let it dry.
This may seem like a small detail, but a closed terrarium stays warm and humid. Starting with a clean container reduces the chance that you introduce mold, pests, or plant diseases along with your new plants.
Clean any rocks, decorations, or tools that will go inside, too.
Step 2: Add the Growing Medium
Add enough fresh potting mix to support your plants’ roots.
You do not need to fill half the container with soil. Penn State recommends using roughly enough potting mix to accommodate the largest root ball in the terrarium. The mix should be damp, not soaking wet, before you begin planting.
What about a gravel drainage layer?
This is one area where terrarium instructions often differ.
Many older instructions—and some current ones—tell you to place gravel or pebbles underneath the soil as a drainage layer. However, Penn State Extension says a rock layer isn’t required and shouldn’t be expected to improve drainage in a closed terrarium. You can still use gravel for appearance if you like the layered look.
The best protection against soggy soil is simple: don’t add too much water.
We will cover terrarium layers in more detail separately.
Step 3: Choose Plants That Can Live Together
A closed terrarium stays humid, so choose plants that appreciate that environment.
Small tropical foliage plants, miniature ferns, mosses, Pilea, and Peperomia are common in closed terrariums. Succulents and cacti usually work better in open terrariums because they prefer drier conditions.
Choose plants with similar light and moisture needs.
Also consider their mature size. A tiny plant at the garden center may not remain tiny. Slow-growing or naturally small plants are usually easier to manage inside a closed container.
You do not need to pack the jar full on the first day.
Step 4: Leave the Plants Room to Grow
No universal rule says a certain percentage of a terrarium must remain empty.
Instead, use the plants themselves as your guide.
Their roots need enough soil to establish, and their leaves need room to grow without immediately crowding the glass, lid, or neighboring plants. Penn State recommends choosing plants that fit the container with room to spare.
Leaving some open space also makes the terrarium easier to clean and prune later.
A crowded terrarium may look impressive on day one, but it can quickly become difficult to maintain.
Step 5: Plant the Terrarium
Decide where each plant will go before you start digging.
For a simple arrangement, place the largest plant slightly toward the back or off center, then use smaller plants around it.
Make a hole large enough for each plant’s roots, place the plant into the potting mix, and gently firm the mix around it.
If you are working through a narrow opening, long tweezers, chopsticks, or a long-handled spoon can make the job much easier.
Once everything is planted, remove loose potting mix from the leaves and wipe or brush dirt from the inside of the glass.
Step 6: Add Water Carefully
A new closed terrarium needs moisture, but it does not need to be soaked.
If the potting mix was already damp when you planted, a light mist may be enough.
It is much easier to add a little water later than to remove too much from a container with no drainage hole.
After you close the terrarium, some of the water the plants take up returns to the air and eventually condenses on the cooler glass. That moisture can then run back toward the growing medium. This moisture recycling is why a balanced closed terrarium needs much less frequent watering than an ordinary houseplant.
Penn State describes the goal as establishing a small rain cycle inside the container.
Step 7: Let Wet Leaves Dry, Then Close the Lid
You do not need to leave a newly planted terrarium open for days just because it is new.
Watch the foliage instead.
If the leaves got wet while planting or misting, let them dry before putting the lid on. Penn State recommends closing the terrarium after the foliage has dried.
Once the lid is on, watch the glass over the next several days.
Some light condensation is normal in a closed terrarium. Heavy condensation covering the glass for long periods can mean there is too much moisture inside. If that happens, opening the lid temporarily allows some moisture to escape.
Step 8: Put the Terrarium in the Right Light
Place your closed terrarium where it gets suitable light without sitting in direct sun.
Bright, indirect light works well for many common terrarium plants. The exact amount depends on the plants you chose.
Avoid putting a closed glass terrarium where strong direct sunlight can heat it for long periods. An enclosed glass container can become much hotter than the surrounding room and damage the plants.
If the plants don’t get enough natural light, an appropriate grow light may be an option.
Frequently Asked Questions
Can You Make a Self-Sustaining Closed Terrarium?
You can create a closed terrarium that recycles much of its own moisture and needs very little watering.
That is usually what people mean by a self-sustaining terrarium.
But self-sustaining does not mean you seal the lid and never look at it again.
Plants continue growing. Leaves eventually die. Plants can become crowded, and pests or disease can appear. You may occasionally need to prune a plant, remove damaged leaves, clean the glass, adjust moisture, or replace a plant.
A well-balanced closed terrarium can be low maintenance, but it is still a living garden.
How Do You Make a Tropical Closed Terrarium?
The basic building process is the same.
The main difference is plant selection.
Choose small tropical plants that enjoy the warm, humid conditions found inside a closed container. Ferns, mosses, Pilea, Peperomia, and other compact humidity-loving foliage plants are common choices.
Avoid mixing plants simply because they look good together. Plants in one closed container should have similar moisture and light needs.
That gives you a much better chance of keeping them all healthy.
How Long Does It Take to Build a Closed Terrarium?
There is no required construction time.
You can assemble a simple closed terrarium in one session. The time depends mostly on the container, the number of plants, and how complicated you make the design.
Do not rush to finish quickly. Cleaning the container, positioning the plants carefully, and avoiding excess water matter more than shaving a few minutes off the project.
You also don’t need to wait for the terrarium to become established before putting on the lid. Once planting is finished and the foliage has dried, you can close it and watch how the moisture level settles.
Common Beginner Mistakes to Avoid
Most closed-terrarium problems start with a few basic mistakes.
Adding too much water
This is probably the easiest mistake to make. A closed container loses water slowly, so treat water as something you can add later rather than something you need to add generously at the beginning.
Putting the terrarium in direct sunlight
A bright windowsill may look like the perfect place, but direct sun can overheat an enclosed terrarium. Use bright indirect light that matches your plants’ needs.
Choosing plants with different needs
A moisture-loving fern and a dry-loving cactus are poor roommates. Choose plants suited to the same general environment.
Overfilling the container
Give plants room to grow. A terrarium does not have to look full the day you make it.
Using plants that will quickly outgrow the space
Check the mature size of plants instead of judging them only by their size at the store.
Ignoring early warning signs
Watch the terrarium closely during the first few weeks. Remove dead or unhealthy foliage, watch for pests or mold, and adjust excessive moisture before a small problem becomes a bigger one.
A Closed Terrarium Does Not Need to Be Complicated
A successful closed terrarium starts with a clean container, compatible plants, suitable potting mix, very careful watering, and enough light without direct sun.
After that, your main job is to watch what happens.
A little condensation, steady plant growth, and soil that stays moist without becoming waterlogged are signs that the small environment inside the jar is beginning to find its balance.
Start simple. You can always build something more elaborate after you understand how a basic closed terrarium behaves.
Until next time.

Sources and Further Reading
- Penn State Extension — Creating a Closed Terrarium
- Penn State Extension — How to Create a Closed Terrarium
- University of Minnesota Extension — Terrarium Gardening
- Royal Horticultural Society — Terrariums and Bottle Gardens