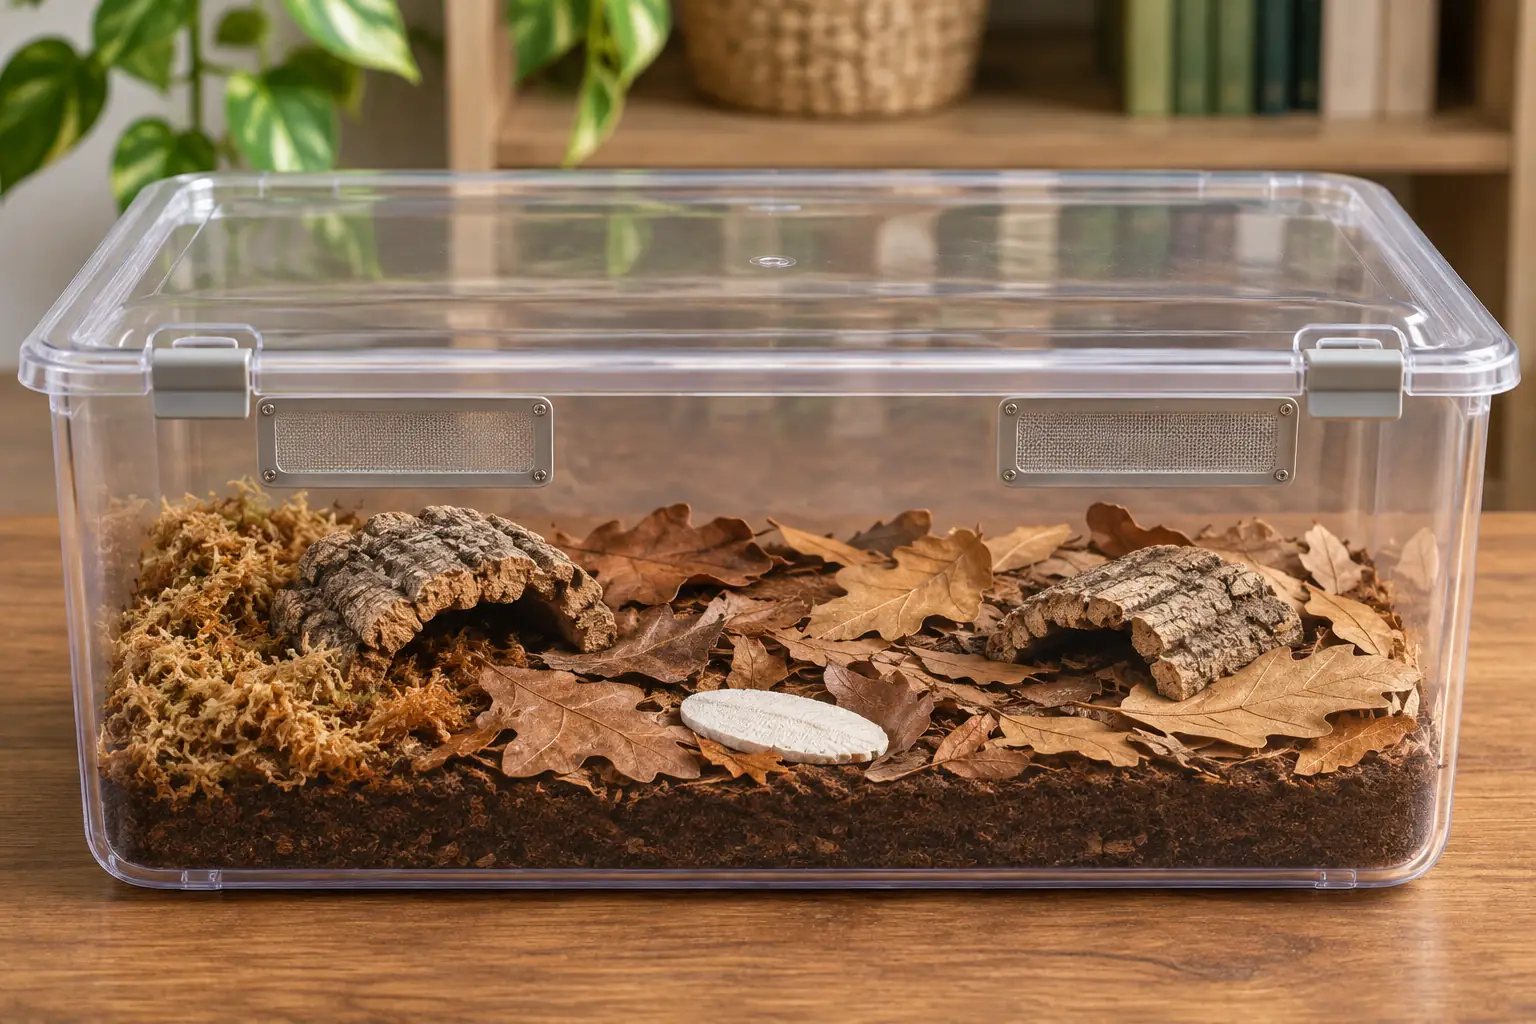
Here’s how to set up an isopod enclosure: choose a secure, ventilated container, add suitable substrate and leaf litter, arrange sheltered damp and drier areas, and check the habitat before introducing animals. Plan around the species you will keep. A good enclosure gives the colony choices and gives you easy access for care.
A display tank can be attractive, and a plain colony tub can be practical. Either way, the important features are mostly down at leaf level. The animals need somewhere to hide, browse, and find moisture; the keeper needs to reach those places without dismantling the whole landscape.
1. Choose the Colony Before the Container
Decide which species you want before buying its home. Our guide to the best isopods for beginners compares four common choices. This setup guide is for a separate pet colony, rather than isopods sharing another animal’s enclosure.
Ask the supplier about the culture’s current housing, ventilation, and moisture needs. Breeder springtails.us describes different layouts for different species and warns that room climate changes how much ventilation works. A photograph of someone else’s successful tub does not tell you everything about the room around it.
For isopod tank size, consider the usable floor as well as the container’s volume. You need space for leaf cover, hides, and different moisture conditions. A tall, narrow jar can hold plenty of air while leaving little room to arrange those features.
There is no single tank size that suits every species and colony. Check the adult size, starting population, and expected growth with the supplier. Choose a container you can inspect and maintain, with room to expand the housing if the colony grows.
2. Choose a Tub or a Display Tank
Portland Insectarium recommends plastic or glass with a secure lid and ventilation. The useful difference is how you will use the enclosure.
- A plastic tub is lightweight and easy to move. Suitable plastic can be adapted with mesh-covered vents, though cloudy walls may limit viewing.
- A glass tank offers a clear view and a more permanent display. Check that its lid and ventilation suit tiny animals, rather than assuming a reptile enclosure will contain them.
Whichever you choose, make sure you can reach the damp area, lift a hide carefully, and remove leftover food. Narrow openings and elaborate decorations can make simple jobs awkward. An enclosure should be pleasant to look at and easy to look after.
Before building, gather the container and lid, suitable vent mesh if needed, isopod substrate, leaf litter, cork bark or another appropriate hide, and material for a damp refuge such as sphagnum moss. Have a suitable calcium source ready, too. Choose materials intended for animal care or with a known, uncontaminated source.
3. Make Ventilation Secure
A tight-fitting lid helps keep animals in. Purpose-made vents allow air exchange. An unmodified airtight food-storage box provides only the first of those two things.
If adapting a plastic container, finish the work while it is empty. Fit fine mesh securely over the openings, check the edges for gaps, and remove cutting debris before furnishing the habitat. A ready-made vented enclosure is another option if you would rather skip the construction.
Check mesh openings against the smallest animals the colony may contain, including babies. Mesh that stops an adult may not stop its young. Smug Bug also notes that isopods can chew through some fabrics, so a loose scrap of cloth is not a dependable barrier.
Vent placement advice varies. Carolina Biological Supply and Aquarimax describe lid ventilation, while Smug Bug favors vents on opposing sides. Those are different husbandry approaches, not proof that every lid vent fails or every side-vent pattern works. Match the layout to the species, container, and room, then check the result.
Leave clear space above the leaf layer and keep vents unobstructed. Do not pack bark and leaves up to the rim. Fresh air matters, but an enclosure that loses its damp refuge too quickly needs adjustment as well.
4. Arrange the Floor and Hiding Places
Add substrate suitable for your chosen isopods, with enough depth for their normal use of the soil. Burrowing habits differ, so use species guidance rather than one universal depth. This is the habitat’s working floor, not simply a decorative layer beneath the animals.
Prepare a damp refuge at one end while leaving a drier area available. Moisten the refuge’s substrate without making it waterlogged, and add a patch of damp sphagnum moss if appropriate for the species. The proportion of damp to drier space should follow the colony’s needs.
Spread leaf litter across the substrate. Place stable pieces of cork bark or suitable hides so animals can shelter in different parts of the enclosure. Keep at least one hide easy to lift and replace gently. Aquarimax describes bark as a gathering place that makes observation easier.
Keep the layout simple enough that you can check beneath the moss or leaves without disturbing everything else. Avoid balancing heavy decorations over loose soil or creating an arrangement that shifts when a hide is moved.
Add the colony’s calcium source and leave an accessible place for small supplemental food portions. Leaf litter is already part of the food supply. A huge welcome-home buffet is not needed to prove the enclosure is ready.
Springtails are an optional addition to this setup. Before adding them, check whether your chosen isopods and springtails can live together under the same conditions.
5. Check for Escape Routes
Can isopods escape? Yes. Zoo Med notes that most have difficulty climbing smooth glass or plastic, but a leaf or stick leaning against the wall can give them a route upward.
Inspect the finished enclosure from the floor to the lid. Move bark, leaves, and tall decorations away from openings. Check lid corners, vent edges, and any cable ports. A barrier needs to work around its entire edge, not just across the middle.
Keep the lid secured when you are not tending the habitat. During maintenance, work over a tray or clear surface where a dropped animal or piece of occupied leaf litter is easier to notice. Check anything you remove before setting it aside.
Can Isopods Live in a Closed Terrarium
If closed means a permanently sealed plant jar, choose a different first home for a pet colony. The care approaches used here all provide ventilation and access for maintenance. A sealed ecosystem adds uncertainties that this beginner setup does not need.
A terrarium with a fitted, ventilated lid is a different matter. It can be suitable when its conditions match the species and you can tend the animals. Judge the actual enclosure, not the word terrarium on the label.
Check the Setup Before Moving In
Put the furnished enclosure in its intended location before adding animals. Keep it out of direct sunlight, and check that the conditions there suit the species. Zoo Med warns that direct sun can heat a terrarium through the greenhouse effect.
Use this final check:
- The lid closes fully, and vent mesh has no loose edges or gaps.
- Leaves and hides cannot bridge the space to an opening.
- The damp refuge is moist beneath its cover, without pooled water.
- The animals can reach a drier area and shelter.
- Vent openings remain clear, with space above the furnishings.
- You can reach the places that need checking without taking the enclosure apart.
Let the enclosure sit in that spot and check it again before introducing the colony. If the refuge dries quickly or the substrate stays soaked, resolve that first. One good check is a starting point; the habitat will still need attention after the animals arrive.
Follow the supplier’s transfer instructions and move the animals gently, close to the substrate. Check folds of packing material for stragglers. Secure the lid and give them time to find cover. A colony that immediately disappears under the leaves may simply be using the home you built.
The best part of a useful setup is what it lets you notice later: a favored hide, a leaf being eaten, a small movement beside the moss. Build for those ordinary moments, and the enclosure becomes much more than a box on a shelf.
Until next time.

Browse more guides in our Isopods category.
Sources and Further Reading
- Carolina Biological Supply — Terrestrial Isopods Care Guide
- Portland Insectarium — Isopods
- Springtails US — Isopod Care Guides
- Aquarimax Pets — Isopod Care
- Smug Bug — Ventilation for Isopods
- Zoo Med — Isopod Education